Monday, December 16, 2013

Chalk board greetings


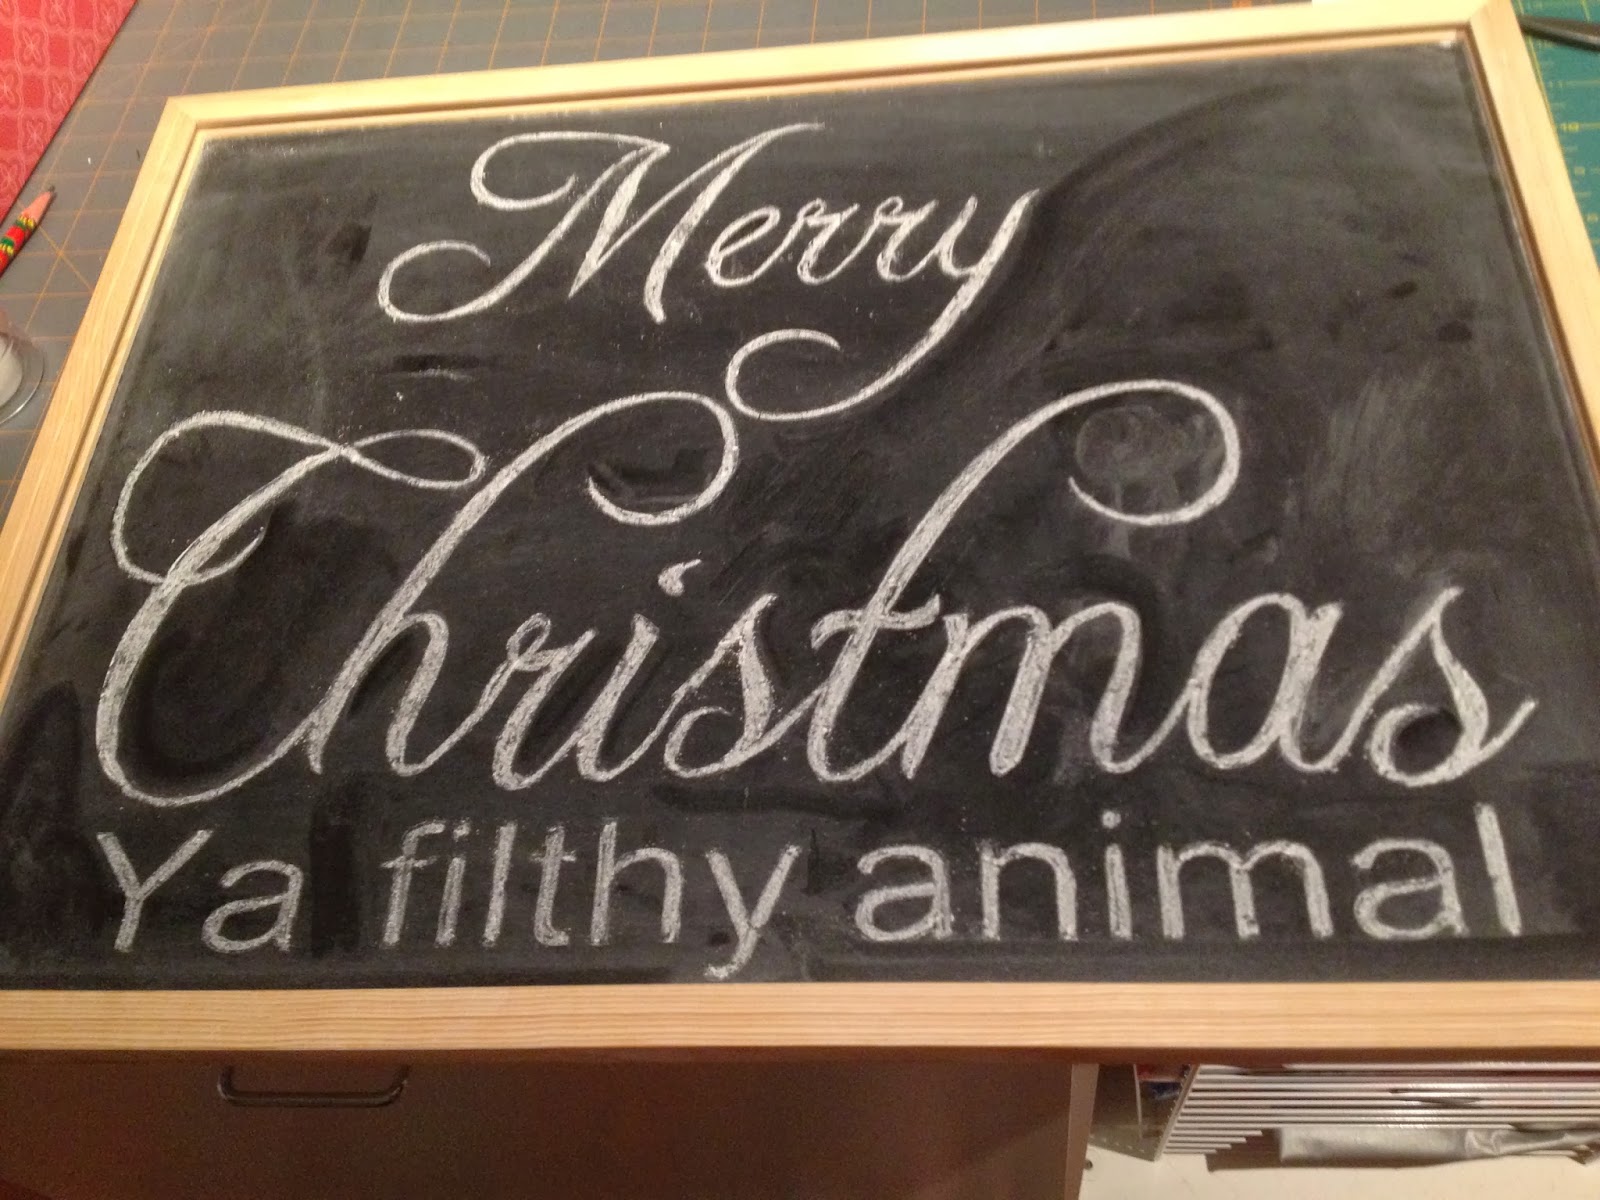
I bought this chalkboard at Hobby Lobby for about $7.00. I've been wanting to try my hand at sign making. I saw this saying on Pinterest and It just made me laugh.  I used my Silhouette machine to cut out a stencil.  It is really hard not to drag your sleeve through it after you draw.  I screwed it up twice so I had to chalk the background in to smooth out the flaws. I used a tiny small dry paintbrush to remove the chalk to make a shadow. It worked like a charm.

I love how this turned out. I took it to a party for a gift exchange. So now I want to make another one for me. I am going to use a board and paint for my next one so it doesn't smear.

Friday, November 1, 2013

Chalk painted baskets

I painted these baskets that I have had for years. First I painted them Graphite. Which is almost black. I wasn't crazy about the color so I painted over them with a dry brush in Provance.


You can see the black showing through here a little bit.
 

This is the bottom of the basket which is a natural rattan. This was the before color.


Christmas Pillowcases


I made these flannel pillowcases for my son's girlfriend because she loves zebra print. I had to add a little bit for accent. I love how they turned out. I will give them to her early so she can use them before Christmas.

Saturday, October 19, 2013

From dark ugly frame to distressed driftwood.


This oil painting has been hanging in my laundry room for at least 15 years. I got it at an art show in my little town. Isn't the frame gross? I wanted to throw it out for years.

I took the picture out of the frame and washed it down with a TSP solution to remove the varnish. It also took some of the dark color off which I wasn't expecting.

I painted it with the Provance color of Chalk paint. Then I clear waxed it and buffed it. It looked great. It had a nice sheen to it. Then.....

I decided to try another coat of wax mixed with Old white Chalk paint. It was actually too much white for me. I really had to rub it good to remove a lot of the white. So here is the finish with the picture back in. I really like it now. What a difference.

Amazing mirror transformation

Before view of Gold mirror and Old white Chalk paint being applied.

Here is the mirror after it was painted white. I flipped it over at this point to try and get into all the nooks and crannies.

Here is the mirror after it was waxed with clear wax and then distressed with dark wax. Then buffed to get a lot of the dark wax off.

Here's a close up of where I rubbed off some of the paint from the bead detail so some of the gold showed through. I think it turned out amazing. I just have to clean up the mirror. I may turn to mirror over and use it as a chalk board.


Do you see this gold mirror? It has been up in my attic for about 10 years. It used to belong to my father-in-law. I think he got it at one of the casinos that closed. He would go to their closing sales and pick up gaudy stuff. Well I took an Annie Sloan Chalk Paint class yesterday and you will be amazed at the transformation.

 These are some of the sample boards from the painting class that I took. The idea is to distress your project. Super easy to do. No pre sanding required, just slap the paint on.

Halloween pillowcase


Here's one of a set of pillowcases that I made. This set is more for a boy.

Halloween Pillowcases


I made 2 sets of pillowcases for 2 of my nieces who are in college. I sent it off to them with a bunch of other goodies in a care package. These are super fast to put together. I hope they like them.

Sunday, September 1, 2013

Fabric Stenciling


     This is what I have been up to lately. This is an experiment with canvas fabric and regular acrylic paint. I cut freezer paper with my silohuette machine and ironed it to the canvas then used a sponge and pounced the painted on to the fabric. I purposely have the post mark partly off of the fabric. I had problems cutting fonts that were very curvy. I wanted to do more of a script font but it ripped the paper too much. I love how the post mark turned out. I will need to get a textile medium to add to my paint for the pillows. I will probably use this scrap piece to cover a junk journal.

Friday, June 28, 2013

Stacks of Tote Bags

I finally finished these 6 tote bags. I had the worst time with skipped stitches with these. It was because of the uneven bulk at the seams and around the handle holes. I had to use my hump jumper to get around the problem. I used thicker than ususal fabric this time. Linking up to
Finish it up Friday... http://crazymomquilts.blogspot.com/
Some of the ladies at work want one of these bags.

I told them I would bring them several to choose from.

Friday, June 7, 2013

Summer Flag Pillow

I literally just threw this together in 2 hours for Finish it up Friday. I had this idea in my head since I bought this fabric last month. I even told the fabric cutter that this is what I was going to make out of this fabric. The stars are little star fish.

This is the back of the pillow. I googled Beach Huts. Then I went on pinterest yesterday and pinned a slew of them. So I raw edge appliqued this to the back and the flag is two sided and flaps. I want to make another pillow with 3 beach huts in a row. That might be my next project. Linking to http://crazymomquilts.blogspot.com/
 

Tuesday, June 4, 2013

Teacher Thank you card and envelope

I still make the occasional card. Tomorrow is my son's last day of school. I whipped this up for one of his teachers. My husband bought him a gift card since he was his mentor for the last 2 years. He is leaving that position and going to another school.  We are going to miss him.

Friday, May 31, 2013

ADDRESS PILLOW finish it up friday


This is the back of the pillow. I used upolstery fabric that I got for $2.99 a yard. Love that price.
 
This is the finished pillow! Do you know how much it costs to buy a pillow form?? It is just ridiculous even with a sale or coupon. So guess what I used?
 
 
Yes, I did! I used a bed pillow from Kmart. It was on sale for--wait for it-$2.77,yep,that's right. I stuffed it right in there. Then I was going to sew it shut. It was too hard to keep the stuffing pushed back away from the presser foot.
 
 
Such a bargain. I bought 3 of these for future use.
 
So, I had to add a zipper in the end.  I just opened this bottom seam a little wider and put that zipper right in there. Piece of cake!


Summer quilt work in progress FMQ


I am still working on the FMQ of this quilt. This is the border. Click to enlarge if you'd like. I really need a better system so the quilt isn't dragging and getting caught on the edges of my sewing table. I am looking into making a larger surface area to keep the drag from happening. I saw something online where the lady stacked large styrofoam sheets the the correct height and cut out an area for the sewing machine bed. It looked fabulous and cheap to do. I need to find it again. I should have bookmarked it. Live and Learn.

Thursday, May 30, 2013

BEAN BAGS

I threw these bean bags together real quick.(pun intended) I saw my great niece playing hopscotch on Facebook and I asked her mother if I should make some bean bags for her. She said, Yes, please, at least it's a toy that she is supposed to throw. She is 4 and her brother is 2. I made 2 for each of them out of scraps.

NUMBERS PILLOW

This canvas fabric I got from my best friend Pat. She got it at an estate sale for next to nothing. The navy dot is a canvas leftover that I already had. I got this idea in my head from browsing the web.

 I have a silhouette CAMEO cutter. I bought it just so I could cut out fabric for iron on applique. I used it to cut out these numbers with the adhesive already ironed on. I just use heat and bond. I don't use the silhouette brand. It works just fine.

 So here is the pillow top only. My sister has a house at the Jersey shore. This is the house address number. I was going to put the name of the street also, but I like it just like this. I was trying to make it look nautical. I will reveal the finish for Finish it up Friday tomorrow.

More tote bag fabric

I'm on another tote bag kick. I went to the cheap fabric store and got this flowered upolstery fabric for $2.99 a yard and it is 54 inch. The green was a little more I think $5.99 a yard. The green one is like a heavy brushed denim. I cut out enough for 8 bags. Just have to get sewing.

Sunday, May 26, 2013

TOTE BAG MAGIC

Another project in the making. I will magically turn this canvas-like fabric into a large tote bag for carrying stuff. I use this for mainly carrying groceries to and from. I have made many a tote bag. Too many to count. I have about 10 of them I take with me to the store at any one time. I store them in my van or my husband's car that way I never have to look for them. They are reversible, versatile, submersible, well you get the idea. 

 Finished and stuffed with a pillow so it will stand up. It is awesome for heavy items like canned goods.

Folds flat for storage. I stuff about 9 of these babies into the other one and I have a hook that I put around the handle to attach it to the cart. The checkers always want to know if I made them and do I sell them. Yes, I made them and no, I don't sell them because I would have to charge at least 25 dollars a bag. It takes me about 3 hours to make one.

Saturday, May 25, 2013

DORM ROOM GRADUATION GIFT

I was invited to my friend's daughter's graduation party. They are not lacking for money so I tried to come up with something unique.  So I perused the internet dorm rooms that are posted out there. What a mess!! lol  So I came up with a clothes pin bag and decorative clothes pins. I want to put magnets on the back of these painted ones. I cut scrapbook paper then modpodged it on. I painted the edges with a coordinating color then when it dried I modpodged the entire thing.
    This is the begining of the clothes pin bag. A baby hanger. I have a ton. My boys are 21 and 17. I give them away when I can. Cleaned the hangers with dish soap and water and dried them.

Here is the finished bag. I got the tutorial from,  http://blog.christyscreations.com/clothespin-bag-tutorial/ . The few things I changed were, 1. I lined the inside back of the bag with contrasting fabric that matched my binding. 2. I rounded my bottom corners. 3. I made a slight gap between the binding edges when I sewed it together. She had them butted right up against each other and now that I made mine, her method was probably better as it sags open a little.

 
The second hanger is wrapped with oxygen tubing. I know what you're thinking. What?? Well it is actually extension tubing that is about 15 feet long. I asked if I could have it after my husband had knee surgery and they gave it to me.  I didn't know what I was going to use it for at the time. But it would make a great clothes line in a dorm room I think. Or a room divider. How about when you come in from the rain and need somewhere to hang your wet clothes. Hang paper, pictures etc. I am going to include some command hooks so they can be removed. This stuff can also be cut to size with a regular pair of scissors and tied in knots on the ends. What can you think of to use it for?? Let me know in the comments.